Needle Technique – How to hold your tattoo machine
Table of Contents
Needle Technique – Preface on how to hold your machine:
I’ve read many articles over the years that have laid out certain needle techniques. They are very specific and focused on how to use your needles to achieve a clean tattoo. This is a question that has popped up many times during my travels and I have noticed that many tattooers are quick to dismiss any critiques on this simple yet foundational aspect of tattooing.
Regarding the articles from years back, I noticed while reading them there was a lack of consensus on what was correct. They all had a difference in technique. The articles touched upon the difference between liner and shader needles but left out grouping effectiveness and what to expect when using them in out-of-context ways. Almost none of the articles focused on small-grouping liner needles or the best way to avoid blowouts when using them. I also never caught wind of an article discussing what is necessary to achieve optimal results with different needles.
Before getting into the short article here that broaches the subject of needle technique, you should read our article about tattooing hands and feet, it has a load of info about the skin.
Needle Technique – The article origin
Funny enough, I was at a convention this week and I had noticed many people using many different machines and different needle groupings.
One thing I had noticed was that everyone was running their machines incorrectly. The speed, angle of inflection and hand speed were all inconsistent with how different types/areas of skin should be tattooed. Nearly all of the tattooers I watched work had the same basic misunderstanding of direction, angle and depth.
I avoided giving any critiques, as many of you would agree with, they were unasked for and totally unwarranted.
I wanted to walk up and give a couple pointers because, truthfully, if they were paying better attention to a couple things, that needle would be giving them better, cleaner, easier lines; quicker and faster.
I know this sounds like a crackpot-asshole calling bluff on a bunch of seasoned artists… I assure you it is not. This is another friendly critique for those out there who want to improve.
So with that preface, on to our article.
Part one – Nah… Another Preface
Let’s start out with liner needles because they are the most commonly overlooked tool. After we work our way through some simple improvements, we will move on the mags. Mags are tricky, mainly because there is many different ways to use them. There is also an inconsistent consensus on how best to use those needles. Some people say “just shading”, others claim ” I fuckin’ line with those bitches!”.
Evidently this is the second preface ( ya, we need a second )
I’m going to skip writing a section on stretching skin. I can imagine that if, by now, you are tattooing full time, that you already have a decent or standing as to how to stretch skin correctly.
If not, Let me know and I’ll work up an article about proper skin stretching. I could cover techniques associated with what type of skin that you’re working with and how your stretch with these different types of skin can affect your quality of work.
Blah…Blah…blah…bl…. *HICCUP!!* get on to it already!
Ok… Onto the article.
Rules of the Tattoo – Liners
Regardless if you use small or large groupings, you will get varying results on the healed end of the tattoo if you don’t follow a few simple needle technique rules.
- Rule 1- Always run your needle against the tube back. This is called moving forward. This ensures the needle stays in contact with the tube tip while running lines. The tubes work best without the needle bouncing around in the tip.
- Rule 2- Look at rule 1
I believe, in the beginning of our careers, when we’re all starting out, that we have focus. Maybe even superhuman focus…
What I’m saying may ring a bell with all y’all, or maybe it is still a thing you live with. There was an ability to focus so hard on all the mechanisms that went into a tattoo that dissipates as we grow in our understanding of the trade.
In the beginning…
In the beginning, we overly focus on what some of us experienced tattooers think of as the mundane. Running lines, whip shading, light source… It something that we may take for granted as practice leads to understanding. That understanding leads to mastery, in most cases.
This leads me to a question: If we are working towards a mastery with knowledge that is incorrect, can we ever obtain mastery?
Funny enough, some of those things that we used to be driven crazy by, when our mentors or just by ourselves we’re trying out new things, have become something that we rarely focus on what we’re doing tattoos as we mature towards mastery.
How often do you pay attention to where your needles are?
Do you only pay attention to what feels right?
Liner needles
Let’s move on and take a look at needle technique using Liners
Small needle grouping – Liners
Needle Technique – Standard Angle
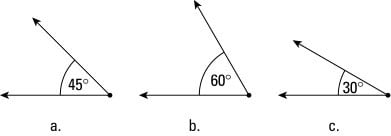
When I first started tattooing, I was told that you had to keep the needles in the tube at an angle somewhere between 45˚ and 60˚ (standard angle or SA) when running lines in the skin. This idea seems to be true for most applications when using a tattoo machine.
Always using that SA will result in the most consistent of results. Especially when using smaller groupings.
I personally only use 3 round and 5 around liners for the vast majority of my work. When this practice first started it was nerve wracking and shit was a bit of a disaster for a week. Luckily, every tattoo I did was built to take a 7-9 round so, the repairs were free and embarrassing.
The result of this experience is that I’m very cautious when ever I run a line. My tube is held in the SA and I am always pushing (mostly) when I’m running and/or sculpting lines.
Needle Technique – Shallow Angle
If you’re like most of us, your hand gets a bit tired and those machines start getting heavy.
When that happens, your machine sags and you run your needle too shallow. Shallow is considered <45° angle
So what dude.. The ink is going in. Who gives a shit… right!?

Nah.. You see, what happens when you run your machine shallow is:
- Your needles won’t penetrate the correct amount unless you press your tube tip and bury the needle.
- You lose most of the pigment by increasing the traveling distance of the needle
- Your machine has to work harder to push the needle in which increases load and decreases machine life.
- If you are pulling a line, the needle will skip across the skin surface leaving little ink but more trauma.

To explain
As you’re moving forward at whatever speed your hand moves, the needle at the end of the tube seems to bounce around. This is because it’s not hitting a directly flat surfaces allowing the needles to penetrate the layer of skin we want, directly.
This also occurs if the skin is in stretched too tight. You see the needles going in but there will be little pigment deposited into the epidermis. The pigment will be trapped in the uppermost layer as the needles won’t get deep enough to deposit the ink properly.
Worse yet, if the needles are running at a steeper angle the needle will just hop along the top not making any sort of penetration, thus leaving any pigment that you want to put into the skin stuck on top of the skin. In this case, the needles just chew up the upper layer of skin for no reason.
Steep angle of tubes
What happens with the needle facing straight-up-and-down to the 90゚ angle, or somewhere between 75 and 90°?

The needle has to work harder to pass through the skin, especially if you have a very tight stretch on a specific area.
When the needle strikes the skin, it doesn’t so much a slide in as it does blow the skin apart to create an opening for the ink to enter.

To bypass this some artist have lightened their stretch and kept the steep angle when tattooing. This needle technique, which may actually work when using smaller needle configurations, still isn’t totally efficient. You can utilize it when trying to build/sculpt lines, but if you’re trying to do very fine lines…Not so much
A bit about Stretching
What you push the pigment into the skin with the needles at a steep angle, while holding a softer stretch, the skin layers that accet the pigment are out of alignment. You can tell this by releasing the stretch after running a line.
When you release that light stretch you will notice that your lines are wavy or inconsistent. This is because the skin is an organ that is susceptible to stresses, like stretching. When you pull skin tight, you squeeze the layers together making an easier path for needles to push through. If you hold it too loose, or stretch incorrectly, the skin layers will move to the position of
What happens with the needle facing straight-up-and-down to the 90゚ angle, or somewhere between 75 and 90 The needle has to work harder to pass through the skin especially if you have a very tight stretch on a specific area. When the needle strikes the skin it doesn’t so much a slide in as it does blow the skin of parts to create an opening for the ink to enter.
To bypass this effect, some artist have lightened their stretch, which may actually work when using smaller needle configurations. It also may work when trying to build lines, but if you’re trying to do very fine lines, the increased trauma will make it impossible let to heal a long sitting, single sitting tattoo well.
Large groupings
Large liner groupings should only ever be used in one way. Run any of your lines the standard 45 to 60゚ angle with a decent stretch, which is determined by skin type.

Watch the effects of your lining when you use these angles. From experience, you’re only going to be getting partial saturation. This is due to a lack of full penetration of all needles entering the skin. This is especially evidence and needle groupings that are loose, such as round shaders
What happens when you bog down?
Yes it is true that you can run steep angles with round shaders, or loose groupings, or large groupings of round liners if you take it slow enough. The partial needle grouping entering the proper depth will deposit enough pigment if you go slow enough. However, this is incredibly poor needle technique.
But, this defeats the purpose of using large groupings. You wanna be able to move fast put the ink in the skin and move on to your next tattoo.
I remember back in the day of Spalding Rogers’, National’s and Danny Fowler’s; people would just crank their machines up to 13 just screamed the pigment into the skin.
When your tossing your needle technique out the window like that, regardless of what your angle was at, the ink went in.
Magnum needles
The industry hasn’t reached a proper concensus about how to use needle mags. Regardless of this fact, there is one generally accepted procedure when using them that will ensure quality results, depending on the style you’re working with.
Soft shading
Soft shading can be accomplished using any dispersion of pigment that you have laid out on your table. The trick here is your needle angle when entering the skip.
Softer shading is better accomplished by having the needles at a steeper angle i.e. Between 75 and 90゚. Having the needles at this steeper angle a causes them to bounce off the surface of the skin due to the largest surface area that is being engaged by the needles. This bouncing off the skin ensures that not all the pigment you want to put in will go in it will just sits superficially in the upper layer of the epidermis.
Just like stated above, care needs to be taken as you will burn through that top layer of skin quickly if you keep a tight stretch while continuously running the needles over the skin surface.
Inversely, you can lighten up on the skin and allow the mags to just bounce off the skin surface. This will give you a softer tone while keeping the potential of a hard edge at a minimum.
Color filling
When filling color you can alternate between steep and normal angles 75 to 90゚ (which is steep) or 45 to 60゚ angles (which is standard). The steep angles can be used to feather out colors when blending while the SA are used for full filling.
Be careful when using the steep angle technique for shading. You need caution because the needles are more prone to chew up the skin if you don’t Get the saturation correct on your 1st pass. Use a standard angle between 45 and 60゚ to put color into the skin. Most people work in small tight circles, but with mags, I have found that a Box Motion works better than circles.
Box motion explained
- The Box motion for filling in color or solid black is as follows
- Start by pushing forward into the skin with the Magnum needle.
- As you start to circle back just pull a hard 90゚ right while lifting the needle out of the skin.
- Finish pulling out of the skin as you pull straight back away from the skin
- Make another 90゚ turn to start heading towards the skin while dropping your needle depth towards the skip.
Lather rinse repeat.
Proper technique
Using small liners proper technique for putting people into the skin is
Get a stretch on the skin or area that you are planning on Tattooing
Get ink in needles and tubes by dipping and in ink cap.
Start your line with the machine tube set up 45- 60゚ off the skin surface
Only move forward with your liner. You will be pushing the needle against the back of the tube. you can shortcut this and/or cheat it by going in a side to side motion.
Never drag your needles backwards when running lines.
Run your line in a smooth motion. What do I mean by smooth?
It’s easy.
Everyone has a range of motion. When you push past the natural range of motion for any muscle grouping that you’re using, your body has to switch between the one muscle group you are using, to another. That switch is necessary to complete the movement.
When you pull a long line, the transition between muscles happen and you’ll get a little shake. Sometimes the shake can be extremely evident, sometimes, not so much.
Finish your line by feathering the line out. You’ll need to do this with every line. Especially if you have to tie one line into another line to complete a longer segment.
Lather rinse repeat until your job is done
Packing tribal
This one seems to be elusive to most people nowadays. When I started tattooing all we did was tribal. It’s what you cut your teeth on you did it 7 days a week 14 hours A-day and if you couldn’t get it right by God you wouldn’t get a color piece.
Perhaps that’s way tribal is just not so in demand now
To pack tribal you go with a mildly shallow angle
Normally, I’ll use the box method of filling, moving in very tight squares. Those squares create a line pass that overlaps each other. When making a pass over to fill in an area next to a spot already done, overlap the area already filled in 1/4 to 1/2 of the way.
To some, this is the most boring aspect of tattooing but I normally make a game out of it and enjoy large swathes of black!
To keep myself busy most the time when I’m doing tribal such as this, I hum meow mix in my head for hours on end.
The cool thing about this (packing tribal, not humming Meow Mix) is when done correctly, the amount of touch ups needed for the person who is receiving the black work is going to be minimal.
That’s correct if done correctly you only really have to touch up tribal you won’t have to redo the whole sucking thing.