How To Successfully Accomplish a Cover Up Tattoo
|
Listen to this Article::
|
In the previous article, we covered some fundamental theories necessary to understand how to approach a cover-up tattoo. In this article, I overview the application process for a cover-up tattoo and how best to heal these procedures.
Table of Contents
Setting a Stencil Over a Cover-Up Tattoo.
Most cover-up tattoos I have dealt with over the years are mainly line work. I don’t know exactly why this happens, but I imagine the client was receiving a tattoo and decided halfway through not to finish it with the current artist. If this is reality, it may have been a good decision for the client to walk away because line work cover-ups are the easiest to attempt. Not only is placing the stencil pretty straightforward, but the chances of scarring are reduced (see the previous article for more information about scar tissues and cover-up tattoos), and healing is usually a breeze!
For tattoos that contain massive swathes of blacks and colors or are heavily scarred, every step can be more complex.
Placing Stencils Over Black Saturated Tattoos
Placing stencils over dark-toned skin or heavily saturated black tattoos can be tricky for folks without much experience with different skin tones. There isn’t any sort of trick to the application, but rather a couple of other products you can use for the stencils that make them easier to see.
The most common colorant we see in tattoo stencils is purple/violet transfer ink. While these products work very well for people with lighter-toned skin, they aren’t as effective on darker tones.
This is because the melanin in darker-toned skin is more effective at absorbing ultraviolet/violet light wavelengths, protecting the body from the sun’s damaging rays. This also means that the body absorbs the wavelengths of light needed for the stencil to be seen effectively!
To get a more legible image, use a stencil product that is red in color. It will make the image shine through.
If you cannot find or do not have red ink-based stencil transfer paper use directional light to see the stencil better.
How to Set Up Your Tattoo Machine For a Cover-up Tattoo.
Running a tattoo machine, whether it is a rotary tattoo machine or coil, over a cover-up tattoo is not the same as undamaged skin. The skin has already been damaged from previous procedures and is filled with pigment. Sometimes the skin is scarred. This means you must adjust the depth at which your needles enter the skin.
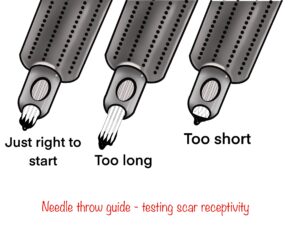
To begin the cover-up tattoo, adjust the needle throw (the distance the needle travels out of the tube) to be as shallow as possible when entering the skin. A good tip for those who don’t feel comfortable eyeballing the throw is to have the needle sticking out of the tube:
- At full extension of the machine, the needle should stick out to the end of the needle bevel/taper.
- Using light pressure, test a single line with a small/medium-sized grouping over various textures of the client’s skin.
- Make notes of how saturation is achieved over
- “normal skin”
- Skin that has already been tattooed.
- Scar tissue.
- Increase the machine throw as needed to fit each skin texture so that a positive result can be seen after a single pass.
- Once a positive result has been found for a skin texture, label or memorizes the use set for the machine precisely – I.E., SCAR MACHINE, or COVER UP, etc.
- Repeat the setup and throw diagnostic until each machine is adequately tuned for each variation in skin texture/construction.

Now that your machines are set up for specific tasks, it is time to start the cover up tattoo.
Mixing Ink In Skin.
The most complex part of a cover up os understanding how pigments interact with each other. Different base pigments reach differently with others and wild color combinations can result if an artist doesn’t fully understand what products they are working with.
But!
This is only a problem for those who are attempting to do a cover up tattoo in a single session.For the artists who have the luxury of multiple passes, the incorrect values obtained from the initial mix aren’t so much of a problem. Why, you ask? Because we can modify most pigments in the skin by carefully mixing new pigments through tattooing. We can also reduce the amount of pigment already in the skin by introducing new trauma.
The Concept of Mixing Pigments.
Tattoos are a permanent, cosmetic modification to a person’s body. This is something everyone knows instinctively but tries to find a way around with pseudoscientific rationalities or technology. The one we see more often is using hydrogen peroxide can remove a tattoo if you apply it topically. There were so many videos supporting this idea we had to make one to dispute the science behind it. Here it is:
While this idea is easily debunked, others are widely accepted as a factual response to the permanency of a tattoo – like laser treatments, which has little to no evidence surrounding its safety (long term). The truth of the matter is that the only way to improve a tattoo in a safe and effective way is to cover a tattoo up. We do this by mixing pigments in the skin.
The Cup Analogy
What if you had 2 cups? 1 cup is filled with a dark colored paint, the other with a light colored paint. What do you think would happen if you emptied the light colored cup into the darker?

The result would be a lighter color than what was already there. Yes, some may spill out and over time the colors may settle at different depths, but the initial reaction is a lighter product.

What if we continued to add light colored paint to the darker cup? Could the two cups (as the light one is constantly refilled, of course) become the same color?

If you keep adding one color to another, allowing extra to spill out while refilling the additive cup, you can get close enough to mimic the lighter color.

This is how you do a cover up tattoo.
What Happens When A Cover Up Tattoo Takes More Than 1 Pass To Finish?
The cup analogy above is a great experiment a person can do at home that shows what happens when a cover up tattoo is attempted. Anyone can do it, and they don’t have to break open the skin to get some experience!
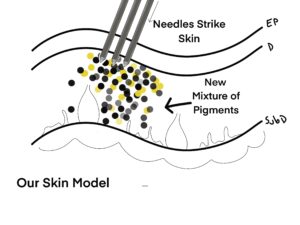
Let’s look at our handy skin model again:

You can see in this cross-sectional model where pigment has been deposited into the dermis. Different depths accommodate different levels of saturation (given off by tonal differences), but the general idea is that this is a healed tattoo. One that needs to be covered up.
If we utilize our machine setup described above and start to introduce another color:
Both colors will occupy the same space, leading to an increased saturation level in the skin. As the mixture of two substances is allowed to heal, some of the pigment inserted, along with pigment that was already deposited in the skin, is ejected through sloughing, or is absorbed into the body.
The resulting quantity of pigment left in the skin is a mixture of two colors. Just like the cup analogy above, we are changing the amount of pigment particles in the skin.
Through repetition, the colors in the skin can be modified or changed, IF AND ONLY IF SCARRING IS KEPT TO A MINIMUM! (Remember how much I harped on scarring in the last article. This is why!)
Managing Trauma.
Having a tattoo heal with little interventions required increased the likelihood of clarity in the future. This is because the skin hasn’t been damaged enough to result in scarred tissues, which influence pigment leakage as people age. So, how do we deal with cover up tattoos, especially if the skin has some level of scarring inside the tattooed area?
We avoid overworking the skin by being able to understand when it has had enough.
if the skin appears swollen, starts weeping blood or heavy amounts of exudate, splits/cracks, or isn’t taking the pigment effectively, try adjusting your needle,throw. If after 2 attempts the pigment still isn’t saturating well, stop the tattoo. Letting it heal fully before attempting the cover again will decrease the chances of additional scarring in the final product.
Remember, it will take many passes to get saturation levels sufficient to cover a tattoo. Taking the time to mitigate scarring will result in a better end product.
Healing a Cover Up Tattoo
depending on the amount of trauma imparted on the skin during the cover up tattoo varying amounts of,interventions are necessary to heal the tattoo,properly.
For those tattoos with little issue, minimal interventions (transparent adhesive bandages, minimal lotion/ointment daily, no change to grooming habits) are required. If the skin does experience more trauma than normally would be seen with a tattoo over y tattooed skin, increasing the interventions should help increase the quality of heal. Wet healing the skin, use of absorbent dressings, avoiding transparent dressings are all options that should be evaluated before dressing the wound and letting the client leave.
There are articles describing various aftercare routines on the website. You can find them by following this link:


